Theme images by kelvinjay. Powered by Blogger.

Latest

Revit Structure

AutoCAD

Revit Architecture

How to Create System Restore Point in Windows 10

Sources: 1

You can access System Restore window via searching in Control Panel or just by right-clicking on Desktop computer icon and navigating to Properties where you will get option of system protection.


In the System Properties box, make sure you are in System Protection tab. In the System Protection tab click on Create button to create your own Restore Point for Windows 10.


Once you clicked on Create button, one small window will pop up, where you can give any name to restore point. In this case, we’ve set it to BEFORE_INSTALL_AUTOCAD, but you can enter your own name. After that, Click on Create button to start the restore point making process.


You can check the progress, it will take few minutes to create restore point. 


After creating of restore point Windows will open one notification dialog that will be show “The restore point was created successfully.”


The above process is very simple to create restore point in Windows 10. You can use same restore point to restore your Windows 10 later.

Perform "Clean Uninstall" of AutoDesk Products (Windows)

Sources: 1

If a previous attempt to install or uninstall an Autodesk® product failed and now you are unable to install or reinstall an Autodesk product on the system, it is strongly recommended that you clean your system by uninstalling all Autodesk products and supporting applications (add-ins, utilities, enablers, etc.) before attempting to reinstall the software.

Before you begin

  • Back up custom files and configurations: The following procedures are intended to completely remove Autodesk products and related support files from your computer, including customization files such as menus, AutoLISP, PGP files, etc. If you wish to preserve any existing customization, be sure to manually back up those files before starting  
  • Restart your computer: Before you start uninstalling your Autodesk products, we recommend you restart your computer system to ensure that any pending Windows operating system updates get applied first.
For most Windows-based Autodesk products, the process of uninstallation can be handled through the Windows Control Panel.
  
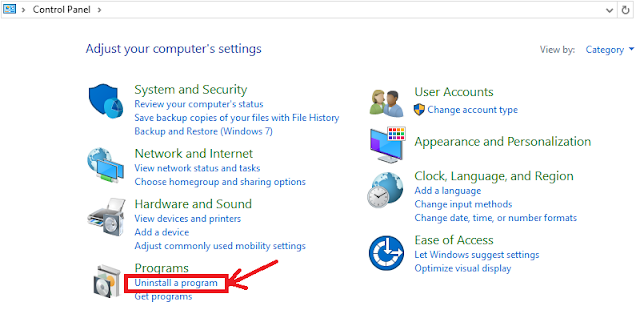
1. Open the Control Panel. The process may be different, depending on your Windows version:


2. Select “Uninstall a program” (Windows 7/Windows Vista/Windows 8.1/Windows 10) or “Add or Remove Programs” (Windows XP):


Note:  Each Autodesk product is listed separately and must be uninstalled separately. Even if you installed all products in a suite in a single installation, each Autodesk product and related add-in, enabler, bonus pack, or other supporting application must be uninstalled separately.


Uninstall peripheral applications

You should uninstall all related peripheral applications before uninstalling the main application. For example, before you uninstall 3DS Max Design, you should first uninstall the FBX add-in for 3DS Max Design and any other related add-ins; then uninstall the main applications. This also applies to modules such as the VBA enabler, Subscription Advantage packs, and Autodesk material libraries.

Note: When uninstalling the Autodesk material libraries, remember that these libraries are shared across all Autodesk products and should not be removed unless you are removing all Autodesk products from the system.

When uninstalling the material libraries, it's best to uninstall from largest to smallest. Begin by uninstalling the medium resolution image library—if that library is installed on your system — followed by the base resolution image library, and then the Autodesk material library.


Uninstall Autodesk products

After you have uninstalled all peripheral applications, uninstall the main Autodesk products:

1. Select the product to be uninstalled and click the “Uninstall/Change” link (Windows 7/Windows 8.1/Windows10) or the “Change/Remove” button (Windows XP):


2. The Autodesk installer opens in maintenance mode, offering several options, including Uninstall.


3. Click Uninstall and click Next to confirm that you want to remove the product from your computer. (If you are prompted to remove shared files, click Yes to All.


4. After the Uninstall is complete, click Finish to close the installer.


5. Repeat steps 1-4 for each Autodesk product to be uninstalled


Note: The uninstall procedure for some Autodesk products may require you to restart the computer when the uninstall has completed. If this is the case, restart the computer as instructed and return to the Control Panel to continue removing any remaining Autodesk products.


Delete remaining Autodesk product files and folders

Warning: The following steps instruct you to delete folders at locations that would affect all installed Autodesk products. These steps assume you have previously uninstalled all Autodesk products and related peripherals and that it is safe to remove those folders.


1. In Windows Explorer, locate and delete the installation folder for each Autodesk product that was uninstalled in the previous procedures. For example: 
C:\Program Files\AutoCAD 2015
C:\Program Files\Autodesk\AutoCAD 2016


2. Delete the following folder:
C:\Program Files\Common Files\Autodesk Shared 
 

Note: These locations may be different if your operating system is configured to store the Program Files folder on a drive other than C, or if you installed your Autodesk product to another drive and folder name.


3. Delete the following user profile folders (substitute your login name for %username%): 

- Windows 7/ Vista/Windows 8.1 / Windows 10:
C:\Users\%username%\AppData\Roaming\Autodesk
C:\Users\%username%\AppData\Local\Autodesk 
C:\Users\Public\Documents\Autodesk
C:\ProgramData\Autodesk 


- Windows XP:
C:\Documents and Settings\%username%\ Application Data\Autodesk
C:\Documents and Settings\%username%\Local Settings\Application Data\Autodesk
C:\Documents and Settings\All Users\Application Data\Autodesk

Windows 7: Depending on your system settings, Windows Explorer may not automatically display all the subfolders under the Users folder. If you cannot find these folders, copy and paste the above folder locations into the Windows Explorer address bar.


Delete remaining Autodesk product entries from the Windows registry

Warning: Improperly editing the Windows registry could render your operating system unusable. Use the Microsoft® Registry Editor at your own risk and only after backing up the registry. Microsoft provides critical information about the registry in the Microsoft Knowledge Base at https://support.microsoft.com/support. See: How to back up and restore the registry in Windows


To edit the registry

1. Log on to the workstation as a member of the local Administrators group.

2. Launch the Run dialog: 
- Windows 7 / Vista / Windows 8.1/ Windows 10: Windows key + R 
- Windows XP: Start > Run


3. In the Run dialog, enter REGEDIT in the Open edit field and click OK


 .
4. In the Registry Editor, locate and delete the following subkeys: 
-  HKEY_CURRENT_USER\Software\Autodesk
-  HKEY_LOCAL_MACHINE\Software\Autodesk


5. Close the Registry Editor.


6. Restart the computer


Before reinstalling any Autodesk products

At this point, each of the previously installed Autodesk products—along with residual files, folders, and registry settings—should be gone from the system. Before you begin installing or reinstalling products, we recommend you perform the following tasks to help ensure a successful installation:
1. Reboot your computer.
2. In Windows Explorer, delete the contents of your Windows Temp folder. Do not delete the Windows Temp folder itself. You can locate the Temp folder by entering %TEMP%& in the Address bar of Windows Explorer.
3. Close all running applications.
4. Disable any virus-checking software running on your system.Virus-checking applications may block certain common activities detected as suspicious, such as accessing the registry or adding, removing, or updating DLL files. Not only can it slow down the installation process, but it can actually introduce corruption. So make sure that your virus checking software is turned off before you install, and make sure to turn it back on afterwards. Several anti-virus programs can be disabled by right-clicking the system tray icon and selecting Disable from the shortcut menu. (For more information about disabling your anti-virus software, refer to the vendor of that software). In some cases, you may need to use the task manager to end the process for the anti-virus software that is still running.


To verify that an anti-virus program is not still running in the background

1. Press Ctrl + Alt + Delete.
  
2. Click Task Manager.

3. On the Processes tab of the Task Manager, select the process for the anti-virus program and then click “End Process”.


Advice:

Before reinstall (or install) your AutoDesk products on your computer, it is advisable that o create a restore point. This avoids that, if something goes wrong, you need to do all this process of "clean uninstallation" and you can just restore your computer settings to the point before you start an AutoDesk product installation or reinstallation. Check here to see how create a "Restore Point".  
 
You are now ready to install your Autodesk products on your computer.

Recommended process for uninstalling and reinstalling AutoDesk products

Sources: 1


Issue: 

You are having problems with your AutoCAD-based product and want to know the recommended process for uninstalling and reinstalling products.


Causes: 

The program files have been corrupted and/or missing.


Solution: 

Repair and reinstall from the Control Panel (Windows Only) Before removing the software, first try to repair your installation from the Windows Control Panel:

1. On the Start menu (Windows), click Settings > Control Panel. In Control Panel, double-click Programs and Features.


2. Select the Autodesk product, right-click in the mouse button and then click Uninstall/Change.


3. When the installer launches, click Repair or Reinstall. Follow the prompts to either repair or reinstall the product.

Remove and reinstall Autodesk software.

If a repair/reinstall from the Windows Control Panel does not resolve the problem (or you are using AutoCAD for Mac), you may need to completely remove the Autodesk software, and then reinstall it. To do so you will need to do a "clean uninstall", please check here how to do it .

MIRRTEXT: Control how you mirror the texts in AutoCAD

Sources: 1


Do you want to Mirror some element on your drawing but keep the text in the same direction? 

There is a system variable called MIRRTEXT that controls how the texts will be mirrored.

The default Value 0, and mirrors the location of the text, but it doesn't mirrors their orientation. If you set the value of MIRRTEXT to 1, then you will be able to Mirror the Text or Mtext as if it was any other object, Block, etc.


Conclusion: 

Enter MIRRTEXT on the command line and change the value to 0 (zero) or 1.


With the value set for '0', this is the result you get: 


With the value set for '1', this is the result you get: 


AutoCAD Select Similar mode

Sources: 1


Do you use Select Similar? It’s a very useful tool to select objects with the type and properties.

You just need to select one object, then right click. Click select similar from context menu.


Now how similar the objects we can choose? Is there any settings we can change?

The behavior of select similar is controlled by SELECTSIMILARMODE system variable. You need to type the variable name at command line to change it. The default value is 130. It means it will choose objects with same name on same layer. You can see the complete list of the options in AutoCAD online help here.

Using Select Similar option: 

You can also can change it by typing SELECTSIMILAR on the command line in AutoCAD (don’t use right click/context menu).


After you activate it, type SE  to choose settings.


It will open a dialog box, where you can set the object’s similarity.


About Bitcode type system variable

This system variable is a Bitcode type. You can combine the options by adding the values.
Let’s take an example. The default value is 130. The value is the sum of 2 (layer) and 128 (name).
Now if we want to select block with the same name but allow us to select it on different layers, we can set it to 128.

There are more object properties that you can choose. Like color or line weight. But keep in mind that if you set object’s color to ByLayer, then it will select all objects that have color set to ByLayer. It will ignore how the object color appear on your drawing.

How to turn drawing file tabs on an off in AutoCAD

Sources: 1


Issue: 

You would like to know how to turn the file tabs on and off in AutoCAD.

Solution: 

On the command line in AutoCAD, use:


- FILETAB command to turn on the file tabs


- FILETABCLOSE command to turn them off.


 Keep in mind also that CTRL-TAB will cycle through your open drawings.

How to turn off Quick Properties in AutoCAD

Sources: 1


Issue: 

You would like to know how to turn off the Quick Properties box in AutoCAD that appears when selecting a drawing object.  Sometimes it happens that you accidentally activate this option and it is very annoying.


Solution: 

Enter QPMODE on the command line and change the value to 0 (zero) or -1.


Alternatively Press CTRL + SHIFT + P on the keyboard to toggle Quick Properties on and off.

What is AutoLISP?

Sources: 1

AutoLISP is AutoCAD's inbuilt programming language. AutoLISP is used to create programs that will automatically generate drawings. This is a procedural programming language. It is inbuilt i.e. if you have AutoCAD full version loaded on you computer then AutoLISP is already there. AutoCAD LT version do not have AutoLISP interface.

User defined customized commands can be added to AutoCAD using AutoLISP. These customized commands will perform the activities that we want to automate. The very simple example can be creating parametric shapes of any complexity. These shapes will be generated considering the parameters defined and values provided at the time of generation.


Why use AutoLISP? / Why learn AutoLISP?

When there are number of different environments such as AutoCAD VBA, AutoCAD.Net, ObjectARX, are available for AutoCAD Customization then why should we use AutoLISP? Very true! But if you have noticed, to do programming using any of the other environments you must be aware of the programming languages specifically needed for that environment i.e. if you want to do programming using AutoCAD VBA you must be familiar with Visual Basic. For AutoCAD.Net you should have programming knowledge of VB.Net or C#.Net. For ObjectARX you should be familiar with C++ & VC++.

That is not the case with AutoLISP. You can straight forward learn AutoLISP & simultaneously do the AutoCAD customization.

It IS recommended you learning AutoLISP in following two circumstances:

1. If you are the first time programmer & not aware of any of the above programming languages
2. If you want to learn AutoCAD customization on your own without joining any training center

How to enable or disable dynamic input in AutoCAD

Sources: 1

Issue: 

The crosshairs in AutoCAD show changing length, size, angle, etc. while drawing objects in AutoCAD (dynamic input) and you would like to enable or disable this feature.  

Solution: 

1. To enable or disable dynamic input, click on the STATUSBAR Costumization Icon:


2. Activate the Dynamic Imput:


3. Toggle the dynamic input icon in the lower left corner of the program:


 Alternatively, press the F12 key to toggle it on and off.

Enabling the Drawing Status Bar in AutoCAD

Sources: 1

Issue:

The Drawing Status Bar that displays the current display configuration and drawing scale is not visible in AutoCAD.

Solution:

To enable the drawing status bar:

1.   Enter STATUSBAR at the command line.


2.   Adjust the variable to 2 to display both the application status bar and drawing status bar.


If the drawing status bar does not display (or certain elements do not appear), toggle the STATUSBAR variable to 0 and then back to 1.